Concealing Payloads: Hiding Shellcode in Image Files with Python and C/C++
Learn how to hide shellcode payloads in plain sight by embedding them into image files, such as PNGs, using Python. Discover how to store embedded images in the resources section of a binary file and extract the hidden payload using C/C++ for stealthy payload delivery and EDR evasion.
Introduction
In this post, I will demonstrate how to hide a shellcode payload in an image file using Python and retrieve it using C/C++. I will use PNG files as an example.
PNG files use an IEND chunk to mark the end of image data. Any bytes appended after this chunk do not affect the file’s integrity or visual appearance, making it possible to hide payloads.
This technique leverages end-of-file markers, allowing data to be hidden in any image format with a similar structure, not just PNG files.
With this method, you can hide encrypted shellcode for discreet payload execution or secretly store sensitive information, such as a list of passwords, without altering the image’s appearance.
This approach makes it easier to bypass security tools and harder for phishing campaigns to be detected.
Check out the video below for a quick demonstration of this project. To dive deeper into the details, scroll down to the table of contents.
If you want to checkout the GitHub Repository you can do so here:
https://github.com/WafflesExploits/hide-payload-in-images
Looking for a Pentester? I’m open for contracts and full-time opportunities – feel free to DM me!
Table Of Contents
- Introduction
- Support
- Hide a payload in a Image file by appending data at the end
- Extract the payload from a Image file on disk using C/C++
- Store the Image file in the resources section (.rsrc) of a binary file
- Extract the Payload from the Image File in the Resources Section (.rsrc)
- (NEW) Extract the Payload from the Image File in the Resources Section via PEB to avoid WinAPI functions
Support
Enjoying my content? Show your support by sharing, liking, or leaving a comment!
You can also support me on buy me a ko-fi to fuel more awesome content:
Hide a payload in a Image file by appending data at the end
As mentioned earlier, PNG files use an IEND chunk to mark the end of image data. Any bytes appended after this chunk do not affect the image’s integrity or visual appearance, making it a perfect spot to hide payloads.
A simple way to do this is by using the cat command:
1
cat payload.bin >> image.png
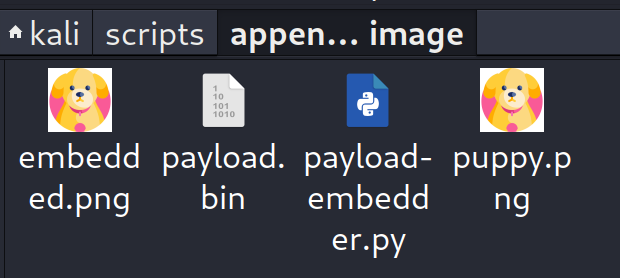
This appends the payload’s bytes to the end of the image file. However, I wanted a cross-platform solution using Python, so I wrote a script called payload-embedder.py.
You can check it out here:
With this script, you can easily embed shellcode into an image file like this:
As expected, the resulting embedded.png looks exactly the same as the original image:
If you want to use this in practice, you can hide encrypted shellcode in image files and later extract it when needed.
There are two methods to retrieve the payload:
- From Disk: Store the image file on disk and extract the payload bytes directly from the file.
- From Resources Section (.rsrc): Store the image file in the resources section of a binary file and Extract the payload from there.
Extract the payload from a Image file on disk using C/C++
Once we embed a payload into an image file, the next step is to extract it. The code below, written in C/C++, demonstrates how to retrieve the payload bytes from the end of an image file stored on disk.
This program assumes that you know the size of the original image file. By comparing the size of the modified image file (with the payload) and the original size, we can determine the exact location and size of the payload.
You can view the code in my GitHub:
This code is split into three main parts:
Constants in Code
Before running the code, there are two constants you need to configure:
- Original File Size (
ORIGINAL_FILE_SIZE):- You can obtain the original file size from the output of the Python script payload-embedder.py when embedding the payload into the image file.
- This value represents the size of the image file before the payload was appended.
- Target File Path (
TARGET_FILE_PATH):- This constant specifies the path to the modified image file containing the hidden payload.
Payload Extraction
The extraction process is handled by the extract_payload() function. Here’s how it works step by step:
- Retrieve the File Size:
- The function calls
get_file_size()to obtain the size of the target image file. This helps validate that the payload exists and gives us the total file size.
- The function calls
- Calculate the Payload Size:
- The size of the payload is determined by subtracting the original file size from the modified file size.
- Seek to the Payload Location:
- Using
fseek, the program moves the file pointer to the position where the payload starts, which is right after the original image data.
- Using
- Read the Payload:
- The payload bytes are read into a dynamically allocated buffer using
fread(). This ensures we have the extracted payload stored in memory for further use.
- The payload bytes are read into a dynamically allocated buffer using
Executing the Payload
The execution process is handled by the ExecutePayloadViaCallback() function, which performs the following steps:
- Allocate Executable Memory:
- The program uses
VirtualAllocto allocate a block of memory that is both readable and executable. This memory is where the payload (shellcode) will be stored.
- The program uses
- Copy the Payload:
- The extracted payload is copied into the allocated memory using
memcpy.
- The extracted payload is copied into the allocated memory using
- Execute the Payload:
- The
SetTimerAPI is used to execute the payload via a callback function. This approach is clean and effective for executing shellcode - You can view a list of callback functions for payload execution by aahmad097 here:
- The
- Free Allocated Memory:
- After execution, the memory allocated for the payload is released using
VirtualFreeto prevent memory leaks.
- After execution, the memory allocated for the payload is released using
Store the Image file in the resources section (.rsrc) of a binary file
In this section, I’ll show you how to embed an image file (or any payload) into the resources section (.rsrc) of a binary file using Visual Studio. I’ll also explain how to find the image file’s Resource ID and Resource Type, which are essential for accessing and extracting the payload programmatically later.
How to store a image file in the .rsrc section.
Follow these steps to embed your image file into the resources section:
- Inside Visual Studio, right-click on
'Resource files'. - Click
Add > New > Show all TemplatesItem. - Go to
'Resource', and select'Resource File .rc'. - This will generate a new sidebar, the
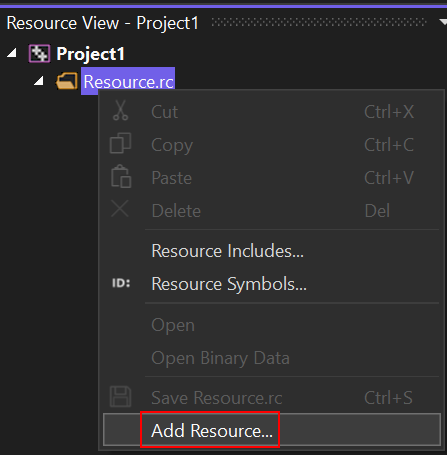
Resource View. - Right-click on the
.rcfile (Resource.rcis the default name). - Select the
'Add Resource'option. - Click
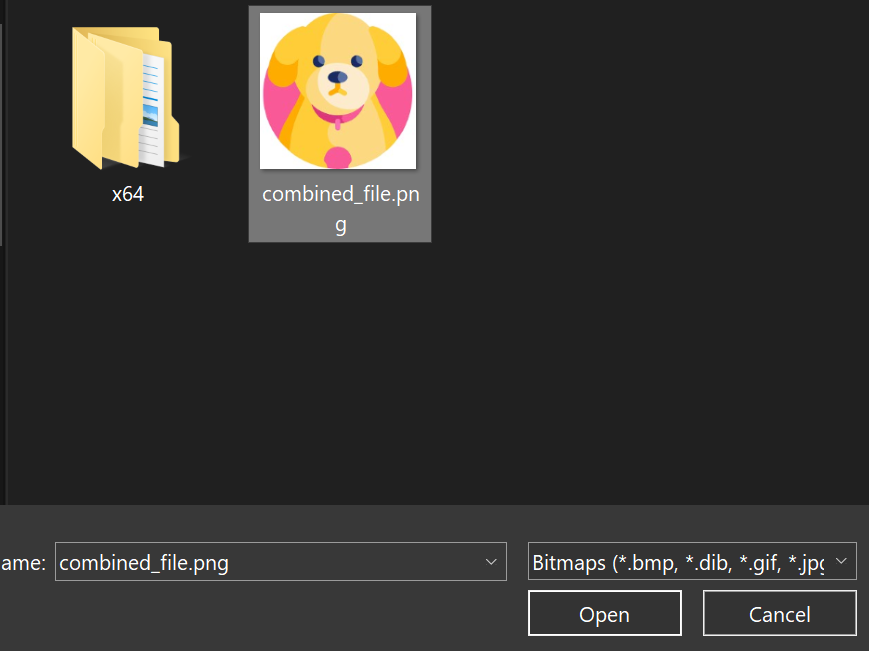
'Import'. - Select your Embedded Image file:
- You should see a new file that represents your Image file.
Finding the Resource file ID and Type
To access your image file via code, you need to find its Resource ID and Type.
To access the image file programmatically, you need two key pieces of information:
To find the Resource ID you need to:
- The Resource ID is defined as a macro named after your image file’s resource name.
- This macro is located in the
resource.hfile. Openresource.hto see the Resource ID:
To find the Resource Type you need to:
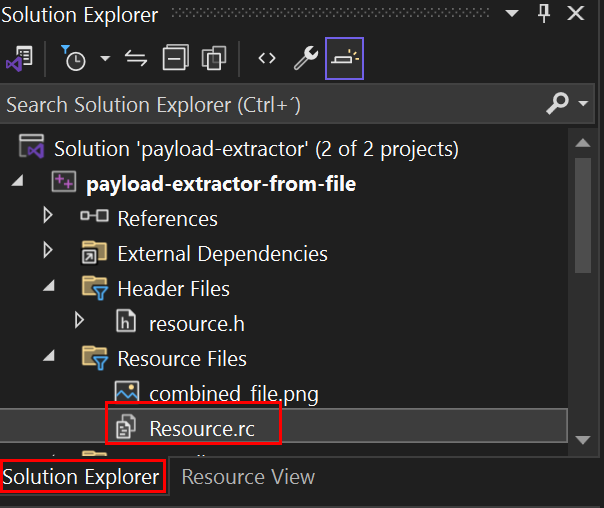
- Go to your Project and Open the
Solution Explorerwindow. - Right-click on
Resource.rc, SelectOpen with...and SelectC++ Source Code Editor (with Encoding). - With the
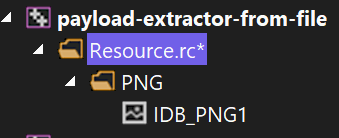
Resource.rctab open, Search by your Image file’s Resource name by pressingCTRL+Fto open. - You should see the Image file’s Resource Type after the Resource name, as shown below:
Extract the Payload from the Image File in the Resources Section (.rsrc)
After storing the modified image file (containing the payload) into the resources section of a binary file, the next step is to extract and execute it. The code below, written in C/C++, demonstrates how to achieve this.
This code works similarly to the previous example of extracting a payload from a Image file on disk. The key difference lies in the Payload Extraction, which retrieves the payload directly from the resources section instead of a file.
You can view the code in my GitHub:
This code is split into three main parts:
- Constants in Code
- Payload Extraction
- Executing the Payload
- This part is the same as extracting a payload from an image file on disk. If you want to learn more about it, visit the Extract the payload from a Image file on disk using C/C++ section.
Constants in Code
Before running the code, there are three constants that you need to set:
- Original File Size (
ORIGINAL_FILE_SIZE):- You can get the original file size from the output of the Python script payload-embedder.py when you embed the payload into the image file.
- This value represents the exact size of the original image before the payload was appended.
- Resource ID (
PAYLOAD_RESOURCE_ID):- The Resource ID identifies your embedded image file in the resource section.
- To find this value, refer to the Finding the Resource File ID and Type section.
- Resource Type (
PAYLOAD_RESOURCE_TYPE):- The Resource Type specifies the type of resource (e.g.,
PNG). - This can also be found in the Finding the Resource File ID and Type section.
- The Resource Type specifies the type of resource (e.g.,
Payload Extraction
The extract_payload_from_resource() function is responsible for retrieving the hidden payload directly from the binary’s resources.
Here’s how it works step by step:
- Find the Resource:
- The function uses
FindResourceW()to locate the resource by its ID (e.g.,IDB_PNG1) and type (e.g.,PNG).
- The function uses
- Load and Lock the Resource:
LoadResource()loads the resource into memory, andLockResource()locks it to ensure safe access to its data.
- Calculate the Payload Size:
- The total resource size is determined using
SizeofResource(). - The payload size is then calculated by subtracting the original file size from the total resource size.
- The total resource size is determined using
- Extract the Payload Bytes:
- Using
memcpy, the function extracts the payload bytes starting from the offset where the original file ends.
- Using
(NEW) Extract the Payload from the Image File in the Resources Section via PEB to avoid WinAPI functions
After storing the modified image file (containing the payload) into the resources section of a binary file, the next step is to extract and execute it.
In this section, I’ll show you how to achieve this without relying on WinAPI functions.
Instead, we’ll manually parse the Process Environment Block (PEB) and PE headers to locate and retrieve the image file and its hidden payload.
This approach is stealthier and more versatile, as it avoids direct use of WinAPI functions like FindResource and LockResource, making it harder for security tools to detect.
You can view the code in my GitHub:
This code is split into three main parts:
- Constants in Code
- Payload Extraction via PEB Parsing
- Executing the Payload
- This part is the same as extracting a payload from an image file on disk. If you want to learn more about it, visit the Extract the payload from a Image file on disk using C/C++ section.
Constants in Code
Before running the code, there are three constants that you need to set:
- Original File Size (
ORIGINAL_FILE_SIZE):- You can get the original file size from the output of the Python script payload-embedder.py when you embed the payload into the image file.
- This value represents the exact size of the original image before the payload was appended.
- Resource ID (
PAYLOAD_RESOURCE_ID):- The Resource ID identifies your embedded image file in the resource section.
- To find this value, refer to the Finding the Resource File ID and Type section.
- Resource Type (
PAYLOAD_RESOURCE_TYPE):- The Resource Type specifies the type of resource (e.g.,
PNG). - This can also be found in the Finding the Resource File ID and Type section.
- The Resource Type specifies the type of resource (e.g.,
Payload Extraction via PEB Parsing
The extract_payload_from_resource_via_peb() function is responsible for retrieving the hidden payload directly from the binary’s resources without using WinAPI functions. Here’s how it works step by step:
- Retrieves the Module Handle:
- The function uses hGetCurrentModuleHandle() to get the handle of the current module by accessing the Process Environment Block (PEB) directly.
- This avoids using
GetModuleHandleor similar WinAPI calls.
- Fetches Resource Data:
- It calls GetResourceData() to manually parse the PE headers, locate the resource directory, and extract the raw resource data and its size.
- This function avoids using WinAPI functions like
FindResourceandLockResource.
- Calculates Payload Size:
- The total resource size is determined, and the payload size is calculated by subtracting the original file size from the total resource size.
- Extracts the Payload Bytes:
- Using
memcpy, the function extracts the payload bytes starting from the offset where the original file ends.
- Using
- Stores the Payload:
- The extracted payload and its size are stored in the provided pointers for further use.
hGetCurrentModuleHandle
1
2
3
4
5
6
7
8
9
10
11
12
13
14
15
16
/**
 * @brief Retrieves the handle of the current module via PEB using architecture-appropriate instructions (x86/x64), avoiding memory walking for reliability.
 *
 * @return HMODULE Always returns the base address of the current module via the PEB's ImageBaseAddress field.
 */
HMODULE hGetCurrentModuleHandle() {
    // Retrieve the PEB pointer using the appropriate method for x86/x64
#ifdef _WIN64
    PPEB pPeb = (PPEB)__readgsqword(0x60);
#else
    PPEB pPeb = (PPEB)__readfsdword(0x30);
#endif

    // Return the image base address stored in the PEB
    return (HMODULE)pPeb->ImageBaseAddress;
}
Here’s how it works:
- Retrieves the PEB Pointer:
- The function uses architecture-specific instructions to access the Process Environment Block (PEB):
- On x64 systems, it uses __readgsqword to access the PEB from the GS segment.
- On x86 systems, it uses __readfsdword to access the PEB from the FS segment.
- The function uses architecture-specific instructions to access the Process Environment Block (PEB):
- Accesses the ImageBaseAddress Field:
- The PEB contains the ImageBaseAddress field, which stores the base address of the current module.
- Returns the Module Handle:
- The function returns the ImageBaseAddress as the module handle, ensuring correct retrieval regardless of compiler optimizations.
Note: This is an updated version of the function.
The original implementation of hGetCurrentModuleHandle walked backward through memory to locate the DOS and PE headers. While this method worked in some cases, it was unreliable and prone to crashes due to invalid memory access, especially in unoptimized builds or when encountering unexpected memory layouts. The updated version directly accesses the PEB, which is a safer and more reliable approach, as the PEB always contains the correct module base address.
GetResourceData
1
2
3
4
5
6
7
8
9
10
11
12
13
14
15
16
17
18
19
20
21
22
23
24
25
26
27
28
29
30
31
32
33
34
35
36
37
38
39
40
41
42
43
44
45
46
47
48
49
50
/**
 * @brief Fetches raw data and size for a specified resource from the current module.
 *
 * @param hModule Handle to the module containing the resource.
 * @param ResourceId ID of the resource to fetch.
 * @param ppResourceRawData Pointer to a pointer where the raw resource data will be stored.
 * @param psResourceDataSize Pointer to a DWORD where the resource data size will be stored.
 * @return BOOL TRUE if the resource data is successfully fetched, FALSE otherwise.
 */
BOOL GetResourceData(HMODULE hModule, WORD ResourceId, PVOID* ppResourceRawData, PDWORD psResourceDataSize) {
    CHAR* pBaseAddr = (CHAR*)hModule;

    // Parse the DOS header to locate the PE headers
    PIMAGE_DOS_HEADER pImgDosHdr = (PIMAGE_DOS_HEADER)pBaseAddr;
    PIMAGE_NT_HEADERS pImgNTHdr = (PIMAGE_NT_HEADERS)(pBaseAddr + pImgDosHdr->e_lfanew);
    PIMAGE_OPTIONAL_HEADER pImgOptionalHdr = (PIMAGE_OPTIONAL_HEADER)&pImgNTHdr->OptionalHeader;

    // Locate the resource directory from the PE optional header
    PIMAGE_DATA_DIRECTORY pDataDir = &pImgOptionalHdr->DataDirectory[IMAGE_DIRECTORY_ENTRY_RESOURCE];
    PIMAGE_RESOURCE_DIRECTORY pResourceDir = (PIMAGE_RESOURCE_DIRECTORY)(pBaseAddr + pDataDir->VirtualAddress);
    PIMAGE_RESOURCE_DIRECTORY_ENTRY pResourceEntry = (PIMAGE_RESOURCE_DIRECTORY_ENTRY)(pResourceDir + 1);

    // Iterate through the resource directory entries
    for (size_t i = 0; i < (pResourceDir->NumberOfNamedEntries + pResourceDir->NumberOfIdEntries); i++) {
        if (pResourceEntry[i].DataIsDirectory == 0)
            break;

        // Locate the second-level resource directory
        PIMAGE_RESOURCE_DIRECTORY pResourceDir2 = (PIMAGE_RESOURCE_DIRECTORY)(pBaseAddr + pDataDir->VirtualAddress + (pResourceEntry[i].OffsetToDirectory & 0x7FFFFFFF));
        PIMAGE_RESOURCE_DIRECTORY_ENTRY pResourceEntry2 = (PIMAGE_RESOURCE_DIRECTORY_ENTRY)(pResourceDir2 + 1);

        // Check if the second-level entry matches the requested resource ID
        if (pResourceEntry2->DataIsDirectory == 1 && pResourceEntry2->Id == ResourceId) {
            // Locate the third-level resource directory
            PIMAGE_RESOURCE_DIRECTORY pResourceDir3 = (PIMAGE_RESOURCE_DIRECTORY)(pBaseAddr + pDataDir->VirtualAddress + (pResourceEntry2->OffsetToDirectory & 0x7FFFFFFF));
            PIMAGE_RESOURCE_DIRECTORY_ENTRY pResourceEntry3 = (PIMAGE_RESOURCE_DIRECTORY_ENTRY)(pResourceDir3 + 1);

            // Retrieve the resource data entry
            PIMAGE_RESOURCE_DATA_ENTRY pResource = (PIMAGE_RESOURCE_DATA_ENTRY)(pBaseAddr + pDataDir->VirtualAddress + (pResourceEntry3->OffsetToData & 0x7FFFFFFF));

            // Store the raw resource data and its size
            *ppResourceRawData = (PVOID)(pBaseAddr + pResource->OffsetToData);
            *psResourceDataSize = pResource->Size;

            return TRUE;
        }
    }

    return FALSE;
}
Here’s how it works:
- Parses the PE Headers:
- The function starts by parsing the DOS header to locate the PE headers.
- Locates the Resource Directory:
- It uses the
DataDirectoryarray in the optional header to find the resource section’s virtual address.
- It uses the
- Iterates Through Resource Entries:
- It iterates through the resource directory entries, comparing the
ResourceIdto find the matching resource.
- It iterates through the resource directory entries, comparing the
- Extracts Resource Data:
- Once the resource is found, it retrieves the raw data and size from the resource data entry.
- Stores the Result:
- The raw resource data and size are stored in the provided pointers for further use.
